Remote Support: install the support plugin
Install it once, and we can look at your screen within seconds whenever you call.
When you phone us or log a ticket, it is usually quicker for us to look at your screen than for you to describe where you are clicking. The Quick Support plugin is what lets us do that. You install it once; it leaves a shortcut on your desktop; and from then on you open the shortcut and read us a session ID when we ask for one.
You stay in control. We cannot connect to your computer unless you open the plugin and type in a session ID that one of our technicians reads to you at that moment. It does not sit watching in the background, and you can end a session whenever you like.
It takes about two minutes, and you only do it once on each computer.
Already installed? Just open it
If you have been through this before, you do not need any of the steps below. Open Quick Support straight from your computer:
- Double-click the Quick Support shortcut on your desktop; or
- press the Windows key, type Quick Support, and press Enter. On a Mac, look in Applications or search with Spotlight.
Then read us the session ID, as in joining a session below.
There is deliberately no "open the app" link on our website. A web page cannot reliably start the support app on your computer, and on some machines an old Zoho installation makes the browser show an error instead. The shortcut always works.
Before you start
- Do this on the computer you actually work on — the one where the problem happens.
- Windows, Mac, Linux and Raspberry Pi are all supported.
- On Windows you may need the administrator password for that PC. If you do not have it, there is an option further down that does not need it — see Step 4.
- Only install this when you have asked us for help, or when we have asked you to.
Step 1 — Open the installer page
Use the button below. You can also reach it at any time from the orange Remote support button in the bottom corner of every page on our website, or from Remote Support on the Support page.
Step 2 — Check that it says Humint
The page tells you who is asking for access to your machine. Before you download anything, read the two lines under The technician details are as follows:
- Technician — the name of the person helping you. For the button above, that is Phillip Venter.
- Organization — this must always read Humint.
If the organisation says anything other than Humint, close the page and phone us on 010 109 0991 before going any further. This is the same check Zoho asks you to make, and it is worth making every time.
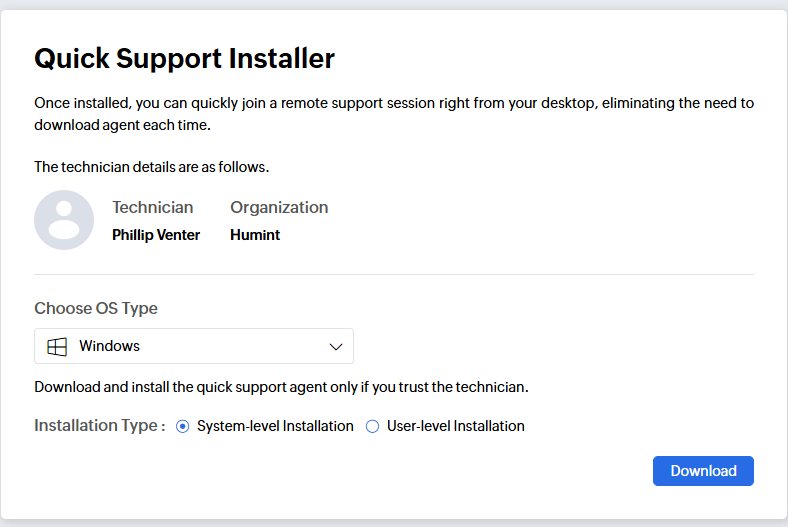
Step 3 — Choose your operating system
Under Choose OS Type, pick the system your computer runs: Windows, Mac, Linux or Raspberry. The page usually guesses correctly, so in most practices you can leave it on Windows.
Step 4 — Windows only: choose the installation type
On Windows you also choose an Installation Type. This option does not appear for Mac, Linux or Raspberry Pi — those have a Download button and nothing else.
| Option | What it means | Choose it when |
|---|---|---|
| System-level Installation | Installs for everyone who signs in to that PC. Windows will ask you to approve it, which usually needs an administrator password. | The best choice for a shared reception or consulting-room PC, where more than one person signs in. Install it once and it is there for all of them. |
| User-level Installation | Installs only for the Windows user you are signed in as. It normally does not need an administrator password. | You do not have the administrator password, or the PC is used by you alone. |
If you are not sure, pick System-level first. If Windows asks for a password you do not have, go back and choose User-level instead.
Step 5 — Download and run it
- Click Download. The file saves to your Downloads folder, and most browsers also show it at the top or bottom of the window.
- Open the file you just downloaded (double-click it).
- If Windows asks whether to allow the app to make changes to your device, choose Yes. On a Mac you may be asked for your Mac password — that is the password you use to sign in to the Mac itself, not your Humint password.
- Wait for it to finish. It is a small program and installs quickly.
Step 6 — Check that it is there
You should now have a Quick Support shortcut on your desktop. If you cannot see it, click the Windows Start button (or press the Windows key) and type Quick Support — it will come up in the list. On a Mac, look in Applications or search with Spotlight.
That is the installation done. You do not need to repeat any of this.
When we call: joining a session
- Open the Quick Support shortcut.
- Go to the Join Session tab.
- Type in the session ID the technician reads to you, and your name.
- Click Join.
- We can see your screen from that point on. When we are finished, close the window or click End Session — you can do that at any time, without asking us.
The session ID is different every time, and it only works while we are waiting on the other end. An old one is of no use to anybody.
If you would rather not install anything
You do not have to. The Remote support button in the bottom corner of our website also takes a session ID directly, without installing anything. It works just as well — the only difference is that you repeat those steps every time you need us, instead of opening a shortcut.
If you are on a Chromebook
Chromebooks work differently, and the installer above will not help you — it only offers Windows, Mac, Linux and Raspberry Pi. There is no .exe to run on ChromeOS.
- Start with the Remote support button on our website and the session ID. If that connects you, there is nothing else to do.
- If it will not connect, the Chromebook app comes from the Google Play Store rather than from us. Phone us on 010 109 0991 and we will point you at the right one for your device.
- Be aware that on a Chromebook we may only be able to see your screen rather than click on it, so expect us to talk you through the clicks.
If something goes wrong
| What you are seeing | What to do |
|---|---|
| Windows asks for an administrator password you do not have | Go back to the installer page and choose User-level Installation in Step 4. |
| You cannot find the shortcut after installing | Press the Windows key and type Quick Support. On a Mac, look in Applications. |
| Windows or your antivirus blocks the file | Do not fight with it — phone us. We will use the no-install option above instead, and raise it with whoever manages your antivirus. |
| The session ID is not accepted | Check you have typed it exactly as we read it, and that we are still on the phone with you. IDs expire once the technician closes the session. |
| A Zoho error appears when a link tries to open the app | An older Zoho installation has left a broken shortcut behind on that computer. Ignore it and open Quick Support from your desktop instead, then tell us so we can tidy it up. |
| You are on a Chromebook | See If you are on a Chromebook — the installer will not work for you. |
| The page does not say Humint | Stop, close it, and phone 010 109 0991. |
Still stuck? Log a ticket on the Support page or phone us on 010 109 0991 and we will walk you through it.